Heat Wave and the Rachio 2

TL;DR Rachio should have included an extra antenna in their v2 sprinkler controller.

Context

Utah, like most of the western U.S., is experiencing a heat wave. Normally, September brings temperatures in the 75°F-85°F range. Instead, Salt Lake City saw a record tying 107°F this past week. I do keep tall fescue grass and mini clover in both my front and back yards and have a Rachio 2 8-zone sprinkler timer. It’s been a great timer for both the mobile app to configure the controller anywhere and has water-saving features like seasonal shift and individual zone programming.

However, the recent heat wave has been raising the temperature in my garage where the Rachio 2 is mounted on the wall. Even though there is an eero Wi-Fi access point only 30 feet away, the added heat is knocking the Rachio 2 off my Wi-Fi around 5pm and it will only re-join around 2am when the temperature goes down. I tried contacting Rachio support about this but they insisted it’s my Wi-Fi network that’s the issue. The controller itself is about 3 years old and during those years, I’ve never had any issue with it staying connected to my network. I’ve also not made any recent changes to the network’s hardware, firmware, or settings. It’s also probable that the controller itself is just getting old and needing to be replaced.

Rachio 2 8-zone controller

Since I’m a tinkerer though, I decided to take the controller off the wall and have a look on the inside. “Maybe I can rig a better heatsink inside,” I thought. Once I got the controller apart, I found some interesting things.

The Extra Space

red: mosfets, yellow: capacitors, purple: resistors, blue: IC, orange: zone wire block

Even though this is the board for the Rachio 2 8-zone controller, it appears to be the same board that would be used for the 16-zone controller minus a few parts. The surface mount pads for those omitted parts are even tinned with flux on them. I’m not implying that I or anyone could simply solder those parts and make this work like a 16-zone controller though. That is likely programmed in the microcontroller’s firmware. Speaking of…

The Brains

AzureWave AW-CU288

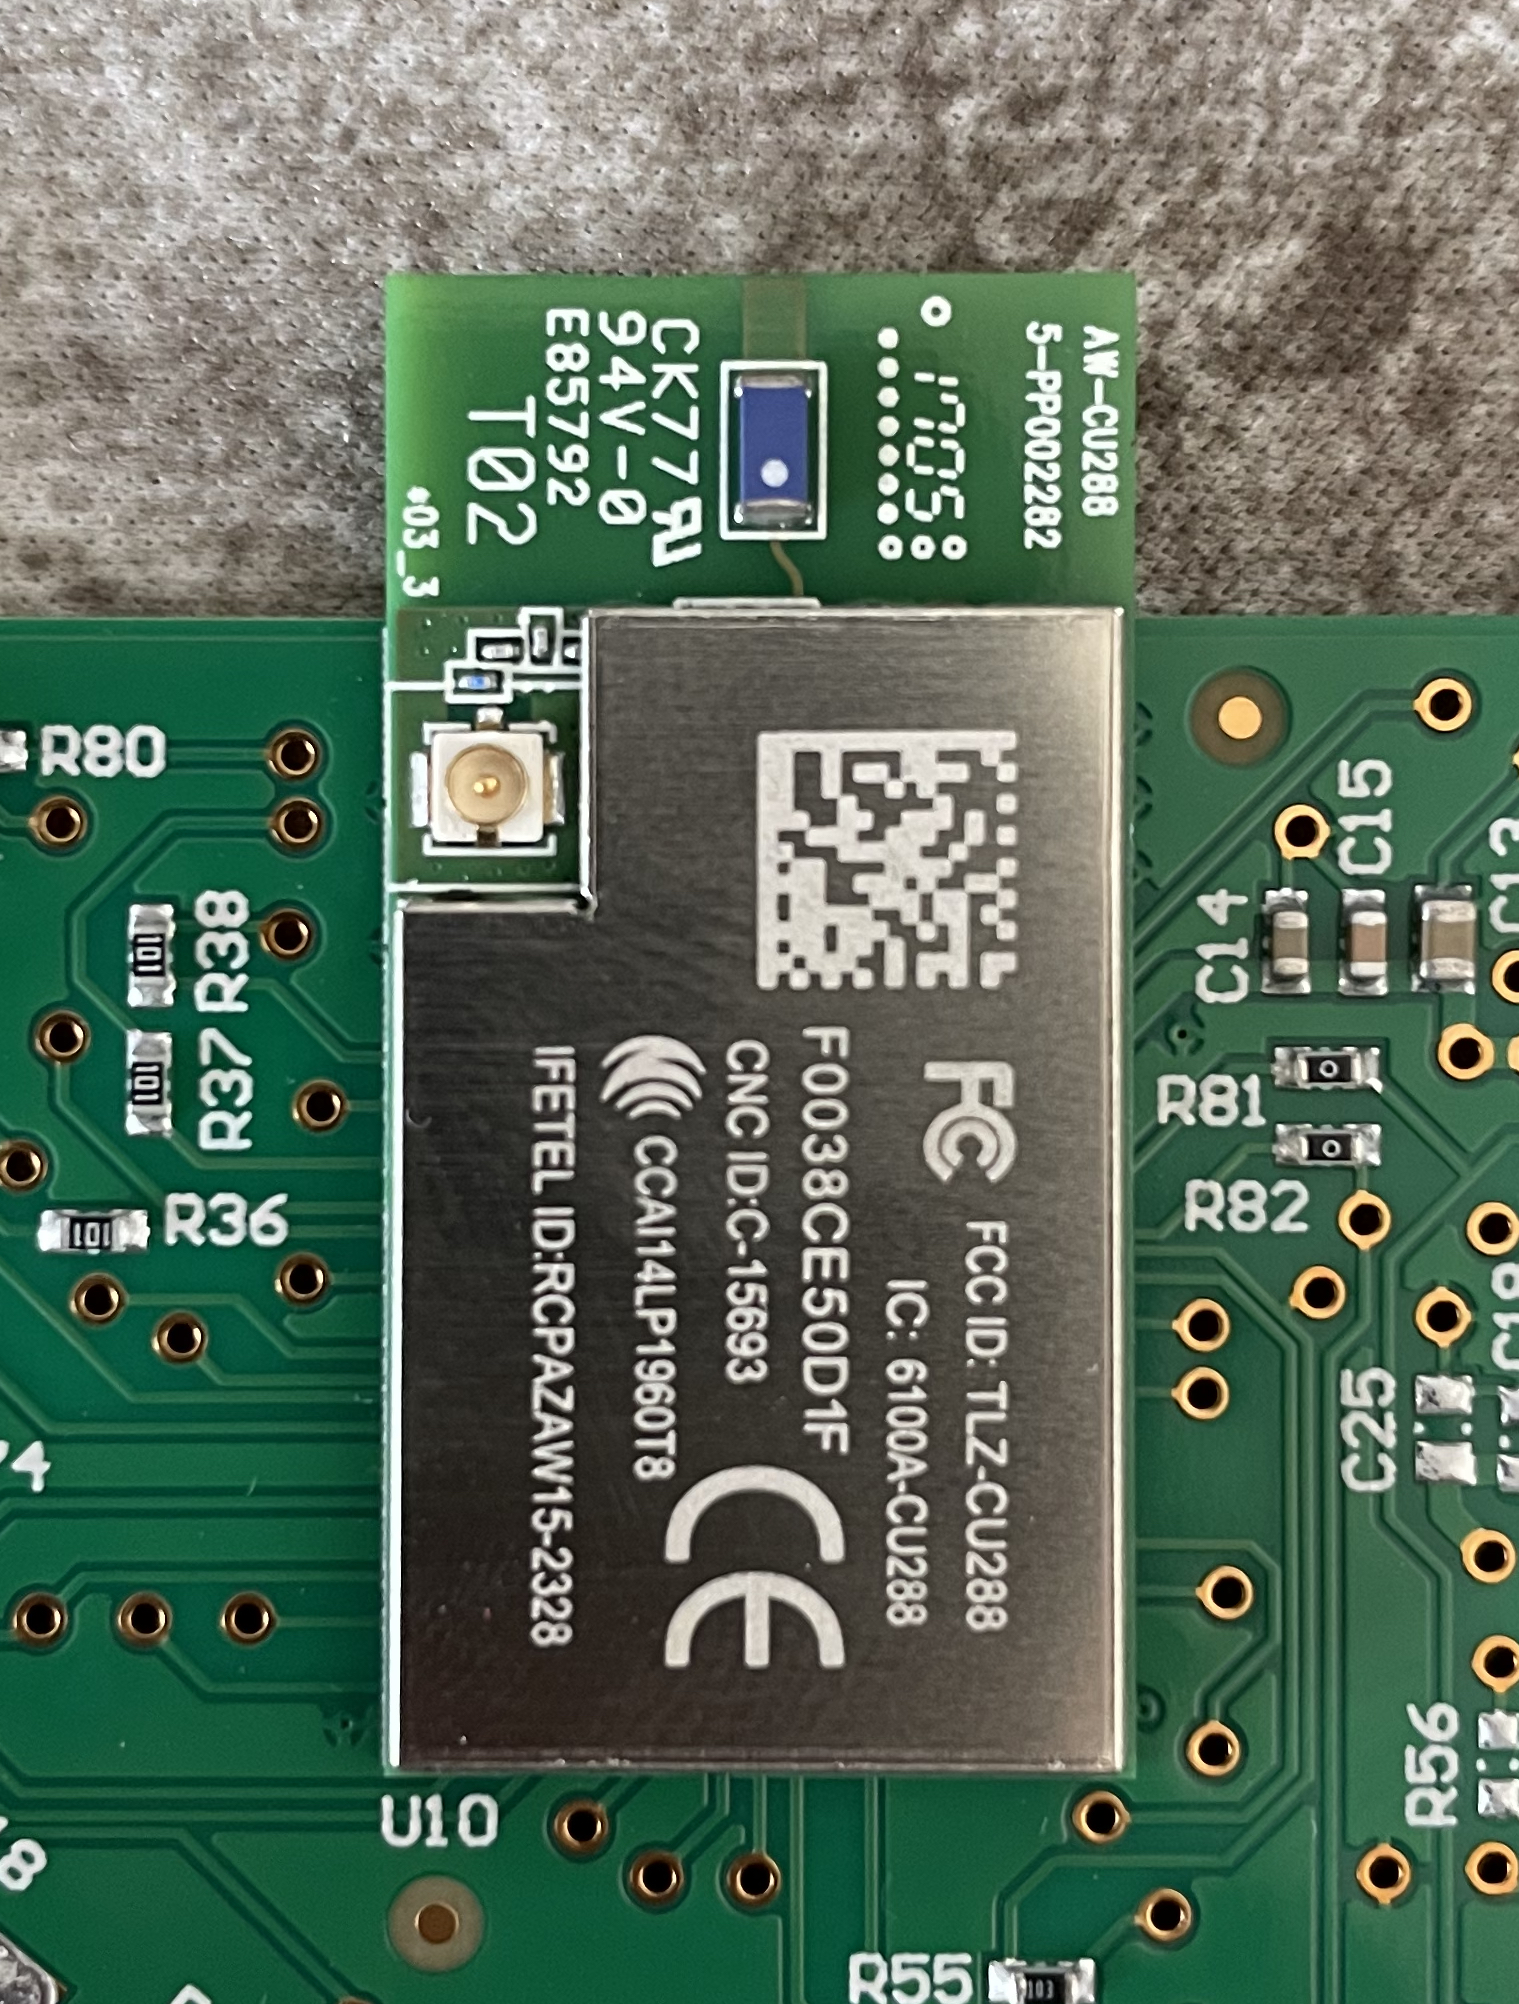
The core of the Rachio 2 is an AzureWave AW-CU288 (Cortex M3 200MHz, 802.11 b/g/n 2.4GHz, 3.3v). Seems like a decent microcontroller though I’m not an expert by any means. (I do know that it’s considered it obsolete now) What I’ve learned from online searches is that the AW-CU288 is capable of operating between -40°C to 80°C. The temps in my garage have been, at their peak, about 99°F (37.2°C). That could mean the internal temp of the Cortex M3 CPU is pushed near the edge of operating temperature. The controller’s EM shield does have a good enough surface to try a small heatsink. But there usually is a decent gap between soldered components and the under side of the EM shield. Before going down that road, I further inspected the board.

There is an integrated antenna that the FCC documents refer to as the “CHIP” antenna (FCC PDF). Considering I’ve never had Wi-Fi trouble in the past, that little CHIP antenna is pretty impressive. However, there is also a dedicated IPEX connector for a monopole/PIFA/dipole connector.
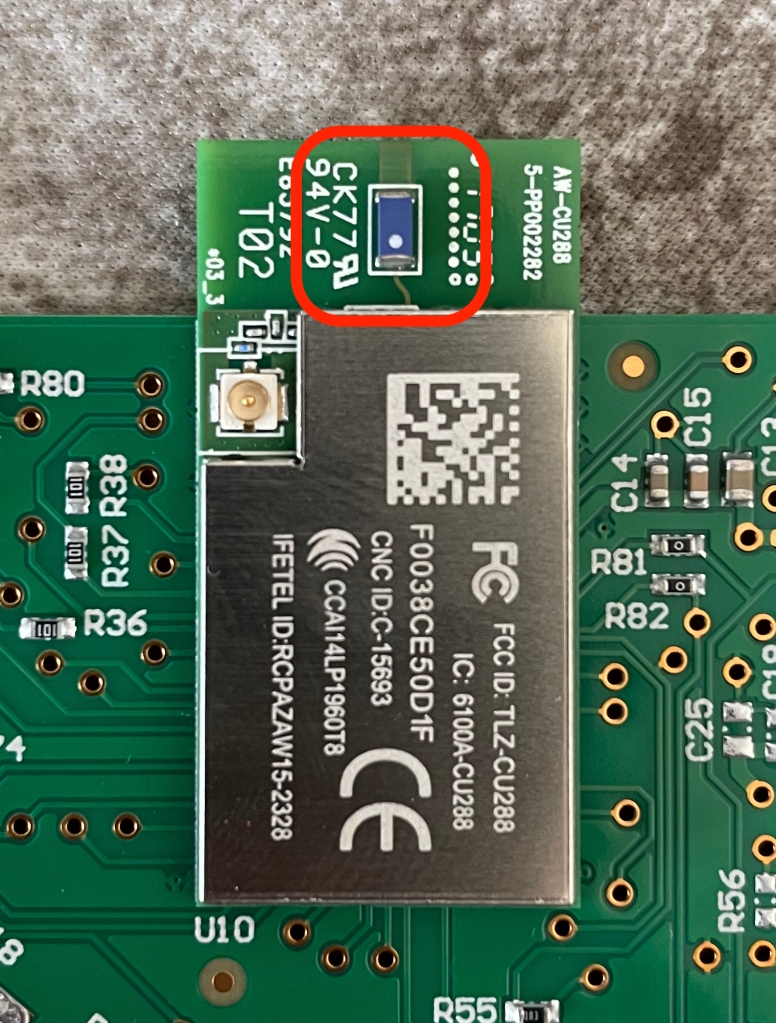
Testing New Antenna

Regardless of the heat issue, it would be better to have a longer antennae on this connector, right? And how much does one even cost? Like, 80¢ at most? Probably closer to 10¢ if buying in bulk. I have a few spare dipole antennas I purchased from AliExpress (product link) for a D1 Mini Pro project.

Dipole antenna attached to IPEX connector

Since the controller housing seems to be made of extruded ABS plastic, I could leave this new antenna inside the housing for a clean look but decided it would be better to route it to the outside. (Between the power cable, zone wires, and moisture sensor plugged in there is a lot of potential for signal noise.) So I drilled a hole in the back housing to route the antenna wire to the outside (antenna PCB came with double-sided tape attached), filled the hole with hot glue, and then re-mounted the controller back on the wall. Not the prettiest but it works for me.

Dipole antenna routed to the outside

After re-attaching the power cable, the controller booted up and joined Wi-Fi faster than it has ever done in the past. (normally ~25-40 seconds, now ~10-15 seconds) The RSSI signal strength is greatly improved as well. I’ve had the controlled setup for a few days and it never dropped from the Wi-Fi even once, where before it was a daily occurrence. Even in 102°F (38.8°C) heat, there is no issue staying online.

Final Thoughts

So is heat the real issue or is it the age of the controller hardware? The truth is that it’s probably both. It could also be the capacitor on the CHIP antenna trace is failing. While the CHIP antenna on the AW-CU288 is impressive for its size, I really think Rachio should have spent the extra 10¢ to put an external antenna on this board. Not only does it significantly boost the signal, which would be great for people who mount their controller on the outside of their home, but it would avoid issues like this one. Should I get an updated unit in the future, I’m definitely going to open it to see if I can add a better antenna.

Geeking out w/ networkQuality

macOS Monterey has a new command line utility called “networkQuality.” Per the man page:

networkQuality allows for measuring the different aspects of Network Quality, including:

     Maximal capacity (often described as speed)

     The responsiveness of the connection. Responsiveness measures the quality of your network by the number of roundtrips completed per minute (RPM) under working conditions. See https://support.apple.com/kb/HT212313

     Other aspects of the connection that affect the quality of experience.

The best part of this tool (IMO) is that it measures the “Maximal capacity” or speed of my internet connection. I know there are other speed test tools available but I like that this one is built-in. As pointed out by Jeff Butts at macobserver.com, “networkQuality uses Apple’s CDN at https://mensura.cdn-apple.com/api/v1/gm/config as the target for its testing.” I’ve seen pretty big differences between using networkQuality and other web based speed testing sites; but, networkQuality seems to most closely match the speed results reported from my eero router.

Lately, I’ve been using GeekTool to add scripts that report the battery percentage of my connected bluetooth devices (AirPods Pro and my Apple Keyboard). I decided that my download speed would be a good addition. I wrote this small python script that parses the JSON output in Mbps and displays the result in the lower left corner of my screen. I have this geeklet set to run every 30min.

#!/usr/bin/python

import json
import subprocess

def mbps(speed):
    return int(round((speed / 1024 / 1024), 0))

# Args: c – outputs in JSON, s – tests download and upload separately
cmd = ["/usr/bin/networkQuality", "-c", "-s"]

response = json.loads(subprocess.run(cmd, capture_output=True, text=True).stdout)

# Download Speed in Mbps
dl_throughput = mbps(response.get("dl_throughput", 0))

# Upload Speed in Mbps (not used at the moment)
# ul_throughput = mbps(response.get("ul_throughput", 0))

print(dl_throughput)

Screenshot of my GeekTool geeklets. Left to right: left AirPod battery, right AirPod battery, keyboard battery, networkQuality download speed in Mbps

Bash Profile Functions Make Life Easier

TL;DR Functions in your .bash_profile can affect the current Terminal session.

The AWS CLI uses the environment variables “AWS_PROFILE” and “AWS_DEFAULT_PROFILE” to know which configured profile to use when running cli commands. If you only have one configured profile, it’s best to leave its name to “default” so that you don’t have to worry about what those environment variables are set to. I have multiple named profiles, though, and need to switch between them on occasion.

I normally switch between profiles by just changing the “AWS_PROFILE” variable to a different named profile. I would normally do this by running an export in my Terminal session.

$ echo $AWS_PROFILE
example1 # Current variable value

$ aws configure list-profiles
example1
example2
example3

$ export AWS_PROFILE=example2

$ echo $AWS_PROFILE
example2 # Variable updated successfully

While this is easy enough, I wanted a quicker way to do it. It would be perfect to have a command that shows me the current profiles and asks which profile I want to change into. I haven’t done shell scripting in a while but here’s what I came up with.

#!/bin/bash

AWS_PROFILES=( $(aws configure list-profiles) )

INDEX=1
printf "\nConfigured AWS Profiles:\n"
for p in "${AWS_PROFILES[@]}"; do
  echo "$INDEX: $p"
  INDEX=$((INDEX + 1))
done
printf "\nEnter profile number: "
read -r choice

PROFILE=${AWS_PROFILES[choice-1]}

export AWS_PROFILE=$PROFILE
export AWS_DEFAULT_PROFILE=$PROFILE
printf "\nAWS profile set to \"%s\"\n" "$AWS_PROFILE"

The script works great except that scripts run in a subprocess. That means that “AWS_PROFILE” is unaffected for the current terminal session, as shown here:

$ echo $AWS_PROFILE
example1 # Current variable value

$ ./aws_profile_script

Configured AWS Profiles:
1: example1
2: example2
3: example3
Enter profile number: 2

AWS profile set to "example2"

$ echo $AWS_PROFILE
example1 # Variable was not updated

The solution is to move the script into a function of my ~/.bash_profile which is able to affect the current terminal session. It looks like this:

#.bash_profile

(...)

# Change AWS Profile
chaws() {
    AWS_PROFILES=( $(aws configure list-profiles) )

    INDEX=1
    printf "\nConfigured AWS Profiles:\n"
    for p in "${AWS_PROFILES[@]}"; do
      echo "$INDEX: $p"
      INDEX=$((INDEX + 1))
    done
    printf "\nEnter profile number: "
    read -r choice

    PROFILE=${AWS_PROFILES[choice-1]}

    export AWS_PROFILE=$PROFILE
    export AWS_DEFAULT_PROFILE=$PROFILE
    printf "\nAWS profile set to \"%s\"\n" "$AWS_PROFILE"
}

Not only does this work correctly, but it even gives me a quick shortcut by just typing chaws.

$ echo $AWS_PROFILE
example1 # Current variable value

$ chaws

Configured AWS Profiles:
1: example1
2: example2
3: example3
Enter profile number: 2

AWS profile set to "example2"

$ echo $AWS_PROFILE
example2 # Variable updated successfully

Yay! Now back to some real work…

Don’t Enable Hardware NAT for IPsec VPN

TL;DR – If you have an AmpliFi HD router and need to connect to a corporate VPN, do not check the “Enable Hardware NAT” box in the WebUI.

I’m still working at home (#flattenthecurve) and using my company’s corporate VPN to access private resources in AWS. Today, I ran into an issue where I was able to connect to my corporate VPN using the GlobalProtect client but was not able to connect to AWS servers or even browse the web. I reached out to my team and later our network admin. They didn’t see the issues I was having and suggested that this issue may be on my network.

I started my troubleshooting by power-cycling everything in my network stack, including my laptop. I own an Arris SURFboard modem, an AmpliFi HD router w/ two mesh access points, a 48-port NETGEAR ProSafe switch, and finally I use a USB-C to Ethernet adapter to connect to a wall port in my office. After power-cycling and reconnecting my laptop to my office’s ethernet port, I still couldn’t connect to my VPN and browse the web.

The next step was to remove variables. I plugged my laptop directly into the modem’s ethernet port and I was finally able to connect to the VPN and access our AWS servers. That meant that my laptop and USB-C to Ethernet adapter were working fine. The issue was upstream from my laptop and downstream from the modem. I reconnected the router to the modem and power-cycled them both again. Then I connected my laptop to an ethernet port on the back of the router. The VPN issues were back. This tells me that something was wrong in the router. The router was working fine with the VPN yesterday though and not today, so what changed?

The biggest part of troubleshooting any electronic system that was working one day and stopped working the next is to answer this simple question: what changed? Well, to make a long story short, here’s what I realized.

Last night, I turned off the WiFi on my laptop and plugged in my ethernet adapter to speed up a transfer to my NAS. This morning, I had not turned the WiFi back on; I was only using ethernet. I turned WiFi back on and the VPN started working like normal again! The WiFi network comes from the same router, same subnet, same everything – just wireless. I dug into my router’s WebUI (which has more advanced settings than the iOS app) and saw one setting that might be the culprit. It’s called “Enable Hardware NAT”.

This setting had been enabled since I got the router almost a year ago but I unchecked it and power-cycled the router. Now the VPN works over strictly ethernet connections as well. After doing some research, I found out two things: 1) I don’t need to enable hardware NAT since I don’t have a gigabit home internet connection, and 2) VPNs don’t like to be double-NAT’d.

The crazy thing is that this was only a problem for me today but in truth, the VPN never worked over ethernet in my home. But because my laptop always had the WiFi connection enabled even when using ethernet, I just never noticed.

Advanced Options in Display Calibrator Assistant

TL;DR – Hold the Option key when clicking “Calibrate” in the Displays preference pane to have the option to enable “Expert Mode”.

Like many, I’m now working from home full-time. To help my home office, I bought an LG 29WK50S extra-wide monitor. It’s inexpensive and gets the job done a bit better than my previous external monitor. Once I got it mounted on my monitor arm and set at the right height, then came the annoying but necessary task of calibrating the color settings.

The monitor itself has the standard options for adjusting the brightness and contrast, and some pre-configured monitor modes which affect color temperature as well. And… that’s it. This is where Apple’s Displays pane in System Preferences comes in and will allow you to calibrate the display even more. Clicking the “Calibrate” button will open the Display Calibrator Assistant. By default, the Assistant limits your options to basically just adjusting the Target White Point. That’s good but not enough. In previous OS releases, there used to be an option to enable “Expert Mode” which would also give you control over Native and Target Gamma.

To get that checkbox back, you just need to hold the Option key on the keyboard and then click the “Calibrate” button. Boom! There’s the checkbox. IMO, this checkbox should always be there and just unchecked by default instead of hiding it.

py-dep

Backstory

If you’ve read my post about the road to creating the py-acc module, you’ll know that while working for Simply Mac I made a Python module to help enroll devices with AppleCare+. Well, the need came up long ago to also be able to enroll customer’s devices purchased from us into the customer’s DEP account. This process was far more complex than getting things ready for AppleCare+ enrollments but we managed to get Apple’s sign-off. As before, while I’m not able to share the full code that made our application great, I can share a piece of it.

The Goods!

py-dep on GitHub is our Python module that interfaces with the DEP API to enroll customer devices into DEP. This one even includes objects to help structure your data in the proper format to be sent to Apple. My intent is to allow this to be used, scrutinized, and improved by the Apple Reseller community and Python developers in general.

Let me know what you think!

Access JSON String in Django Templates Like a Dictionary

One of the reasons I like to use JSONFields in my Django applications is that I can store an entire REST API request body and response body as a JSON object to be accessed like a dictionary later. I would even access it this way in templates to dynamically display data. It’s magical.

However, I’ve recently imported a bunch of data and the JSONField validation managed to import the API responses as strings instead of valid JSON. Why? I don’t know for sure yet but it bothers me.

So I wrote a quick template tag that will process the JSON string and return a dictionary-like object which allows me to parse data the same as before. Beautiful.

# custom_tags.py
import json

from django import template

register = template.Library()


@register.filter(name='jsonify')
def jsonify(data):
    if isinstance(data, dict):
        return data
    else:
        return json.loads(data)


This only requires me to change my template slightly. Here’s what it looked like prior to Django 2.2:

{% for call in api_calls %}
    {% if call.response.specificResponseKey %}
        <p>{{ call.response.specificResponseKey.anotherSpecificKey }}</p>
    {% endif %}
{% endfor %}

And after applying my new template tag:

{% load custom_tags %}

{% for call in api_calls %}
    {% with call.response|jsonify as response %}
        {% if response.specificResponseKey %}
            <p>{{ response.specificResponseKey.anotherSpecificKey }}</p>
        {% endif %}
    {% endwith %}
{% endfor %}

While I could find out why the JSONField didn’t translate the whole API response, which was in valid JSON format, I think this post was more about solving a specific problem in a forward thinking way. Should data be imported improperly again in a way I can’t anticipate, the templatetag will have my back.

py-acc

Backstory

I currently work with an Apple Authorized Reseller, Simply Mac, that is authorized to sell AppleCare+ (AC+) extended warranty plans to its customers. Apple used to have customers manually enroll their extended warranty themselves online after purchase. Nowadays, Apple provides resellers an API to call so that a customer could have their new Apple product enrolled with AC+ before they even leave the store.

To facilitate this, I wrote a custom Django web application that pulls recent AC+ invoices from the Point-of-Sale system using their API, interfaces with Apple’s AppleCare Connect (ACC) REST API, and enrolls the newly purchased AC+ warranty with Apple. This has been working very well for us.

When the request to have automated AC+ enrollments initially came to me, I reviewed Apple’s documentation for the ACC REST API and tried to find if someone had already made a library or module that I could download and use in our application. I was able to find some pre-written code but not for the Python language (which is what Django is written in). So I decided to write a Python module that I could use in our application. This was the first Python module I ever wrote. While I’m not able to open source the full application we use for AC+ enrollments, I am able to provide the Python module I wrote that does a good portion of the heavy lifting.

The Goods!

py-acc on GitHub is our Python module that interfaces with ACC to verify eligibility with, enroll, cancel, and lookup AC+ warranties. My intent is to allow this to be used, scrutinized, and improved by the Apple Reseller community and Python developers in general.

Let me know what you think!

Problems with AWS Linux and PIP

TL;DR

Before creating a virtual environment in an AWS Linux instance, I’m going to save my sanity and run:
unset PYTHON_INSTALL_LAYOUT

The Situation

If you read my post about using pymssql in AWS Lambda, then you know that I use an AWS Linux instance, not Ubuntu or CentOS, for deploying Python packages because it closely mirrors the Linux environment in AWS Lambda. If it works in one, then it works in the other. Maybe I’ll start getting into Cloud9 soon but I digress. After creating a virtual environment in the instance, I will use the ‘pip‘ command to install my applications dependencies in the virtual environment. However, I’ve recently come to learn that AWS Linux instances have a weird quirk with ‘pip’ that is annoying but simple to solve.

The Problem

To illustrate, I created a virtual environment called ‘small_env’ and installed the ‘Cython’ package inside using ‘pip’.
pip install cython2

As you see from the above image, ‘Cython’ installed without issue; but, when I ask ‘pip’ to show me the installed packages, ‘Cython’ is not found.
pip list

How could the package have installed correctly and not be listed? I ran a ‘find’ command and discovered that Cython was indeed installed in my virtual environment. It was installed in the small_env/lib64/python3.6/dist-packages/ directory. I thought this was odd since ‘pip’ on my Mac always installs things in a ../site-packages/ directory. It’s not a big deal though until you realize that the default Python PATH in AWS Linux doesn’t include the former directory:
python path
This is caused by the package ‘system-rpm-config’ which is installed as part of the “@development tools” group defining the following environment variable: PYTHON_INSTALL_LAYOUT=amzon.

The Solution

I thought I might be able to run a command to find all the paths where ‘pip’ might install something and add it to my PATH but it turns out that doesn’t fully fix the issue. What will fix the issue is a simpler command I found in a comment from a user named ‘brad-alexander’ on GitHub. Before creating the virtual environment, just run: unset PYTHON_INSTALL_LAYOUT
unset PYTHON_INSTALL_LAYOUT
That’s it! Without this variable set, everything works fine, because packages are installed into the site-packages directory which is in the search path.

Phonetic Passwords

Problem

Have you ever had to communicate a password with someone over the phone? Unfortunately, I have and I usually dread it. When I have to communicate passwords over the phone (thankfully not often) I will usually pull up a NATO phonetic alphabet so I don’t have a Brian Regan moment.

Idea

Today, I got to thinking that I could probably just write a script to process each character in a password string and output the phonetic names. Then I realized that someone has probably already done this. To Google I went and did indeed find someone who had written a script for this very thing. Brandon Amos wrote a small python script called phonetic.py that will spit out the phonetic names of characters in a string of text, no matter the size. Here’s an example:phonetic

New Problem

It’s not perfect for my needs as it doesn’t do any special treatments for numbers/special characters and doesn’t differentiate between capital and lowercase letters. See the treatment of ‘yY’ in the image below. phonetic_fail

Solution

So, I forked Brandon Amos’s repo and created a new file to handle capitals, name the ASCII characters found in good passwords, and even spell out the numbers. This may seem silly since you shouldn’t need to see the word for each number but I wanted this to be as uniform and fool-proof as possible. This is what we get running the same string as before through the new phonetic_password.py file.
phonetic_password

Get the Code

Here’s a direct link to the file: phonetic_password.py

P.S.

If you like the nice screenshots in this post, I made them with Carbon.