Bash Profile Functions Make Life Easier

TL;DR Functions in your .bash_profile can affect the current Terminal session.

The AWS CLI uses the environment variables “AWS_PROFILE” and “AWS_DEFAULT_PROFILE” to know which configured profile to use when running cli commands. If you only have one configured profile, it’s best to leave its name to “default” so that you don’t have to worry about what those environment variables are set to. I have multiple named profiles, though, and need to switch between them on occasion.

I normally switch between profiles by just changing the “AWS_PROFILE” variable to a different named profile. I would normally do this by running an export in my Terminal session.

$ echo $AWS_PROFILE
example1 # Current variable value

$ aws configure list-profiles
example1
example2
example3

$ export AWS_PROFILE=example2

$ echo $AWS_PROFILE
example2 # Variable updated successfully

While this is easy enough, I wanted a quicker way to do it. It would be perfect to have a command that shows me the current profiles and asks which profile I want to change into. I haven’t done shell scripting in a while but here’s what I came up with.

#!/bin/bash

AWS_PROFILES=( $(aws configure list-profiles) )

INDEX=1
printf "\nConfigured AWS Profiles:\n"
for p in "${AWS_PROFILES[@]}"; do
  echo "$INDEX: $p"
  INDEX=$((INDEX + 1))
done
printf "\nEnter profile number: "
read -r choice

PROFILE=${AWS_PROFILES[choice-1]}

export AWS_PROFILE=$PROFILE
export AWS_DEFAULT_PROFILE=$PROFILE
printf "\nAWS profile set to \"%s\"\n" "$AWS_PROFILE"

The script works great except that scripts run in a subprocess. That means that “AWS_PROFILE” is unaffected for the current terminal session, as shown here:

$ echo $AWS_PROFILE
example1 # Current variable value

$ ./aws_profile_script

Configured AWS Profiles:
1: example1
2: example2
3: example3
Enter profile number: 2

AWS profile set to "example2"

$ echo $AWS_PROFILE
example1 # Variable was not updated

The solution is to move the script into a function of my ~/.bash_profile which is able to affect the current terminal session. It looks like this:

#.bash_profile

(...)

# Change AWS Profile
chaws() {
    AWS_PROFILES=( $(aws configure list-profiles) )

    INDEX=1
    printf "\nConfigured AWS Profiles:\n"
    for p in "${AWS_PROFILES[@]}"; do
      echo "$INDEX: $p"
      INDEX=$((INDEX + 1))
    done
    printf "\nEnter profile number: "
    read -r choice

    PROFILE=${AWS_PROFILES[choice-1]}

    export AWS_PROFILE=$PROFILE
    export AWS_DEFAULT_PROFILE=$PROFILE
    printf "\nAWS profile set to \"%s\"\n" "$AWS_PROFILE"
}

Not only does this work correctly, but it even gives me a quick shortcut by just typing chaws.

$ echo $AWS_PROFILE
example1 # Current variable value

$ chaws

Configured AWS Profiles:
1: example1
2: example2
3: example3
Enter profile number: 2

AWS profile set to "example2"

$ echo $AWS_PROFILE
example2 # Variable updated successfully

Yay! Now back to some real work…

Don’t Enable Hardware NAT for IPsec VPN

TL;DR – If you have an AmpliFi HD router and need to connect to a corporate VPN, do not check the “Enable Hardware NAT” box in the WebUI.

I’m still working at home (#flattenthecurve) and using my company’s corporate VPN to access private resources in AWS. Today, I ran into an issue where I was able to connect to my corporate VPN using the GlobalProtect client but was not able to connect to AWS servers or even browse the web. I reached out to my team and later our network admin. They didn’t see the issues I was having and suggested that this issue may be on my network.

I started my troubleshooting by power-cycling everything in my network stack, including my laptop. I own an Arris SURFboard modem, an AmpliFi HD router w/ two mesh access points, a 48-port NETGEAR ProSafe switch, and finally I use a USB-C to Ethernet adapter to connect to a wall port in my office. After power-cycling and reconnecting my laptop to my office’s ethernet port, I still couldn’t connect to my VPN and browse the web.

The next step was to remove variables. I plugged my laptop directly into the modem’s ethernet port and I was finally able to connect to the VPN and access our AWS servers. That meant that my laptop and USB-C to Ethernet adapter were working fine. The issue was upstream from my laptop and downstream from the modem. I reconnected the router to the modem and power-cycled them both again. Then I connected my laptop to an ethernet port on the back of the router. The VPN issues were back. This tells me that something was wrong in the router. The router was working fine with the VPN yesterday though and not today, so what changed?

The biggest part of troubleshooting any electronic system that was working one day and stopped working the next is to answer this simple question: what changed? Well, to make a long story short, here’s what I realized.

Last night, I turned off the WiFi on my laptop and plugged in my ethernet adapter to speed up a transfer to my NAS. This morning, I had not turned the WiFi back on; I was only using ethernet. I turned WiFi back on and the VPN started working like normal again! The WiFi network comes from the same router, same subnet, same everything – just wireless. I dug into my router’s WebUI (which has more advanced settings than the iOS app) and saw one setting that might be the culprit. It’s called “Enable Hardware NAT”.

This setting had been enabled since I got the router almost a year ago but I unchecked it and power-cycled the router. Now the VPN works over strictly ethernet connections as well. After doing some research, I found out two things: 1) I don’t need to enable hardware NAT since I don’t have a gigabit home internet connection, and 2) VPNs don’t like to be double-NAT’d.

The crazy thing is that this was only a problem for me today but in truth, the VPN never worked over ethernet in my home. But because my laptop always had the WiFi connection enabled even when using ethernet, I just never noticed.

py-acc

Backstory

I currently work with an Apple Authorized Reseller, Simply Mac, that is authorized to sell AppleCare+ (AC+) extended warranty plans to its customers. Apple used to have customers manually enroll their extended warranty themselves online after purchase. Nowadays, Apple provides resellers an API to call so that a customer could have their new Apple product enrolled with AC+ before they even leave the store.

To facilitate this, I wrote a custom Django web application that pulls recent AC+ invoices from the Point-of-Sale system using their API, interfaces with Apple’s AppleCare Connect (ACC) REST API, and enrolls the newly purchased AC+ warranty with Apple. This has been working very well for us.

When the request to have automated AC+ enrollments initially came to me, I reviewed Apple’s documentation for the ACC REST API and tried to find if someone had already made a library or module that I could download and use in our application. I was able to find some pre-written code but not for the Python language (which is what Django is written in). So I decided to write a Python module that I could use in our application. This was the first Python module I ever wrote. While I’m not able to open source the full application we use for AC+ enrollments, I am able to provide the Python module I wrote that does a good portion of the heavy lifting.

The Goods!

py-acc on GitHub is our Python module that interfaces with ACC to verify eligibility with, enroll, cancel, and lookup AC+ warranties. My intent is to allow this to be used, scrutinized, and improved by the Apple Reseller community and Python developers in general.

Let me know what you think!

pymssql in AWS Lambda

I’m currently writing a Django web app that pulls information from a MS SQL database. Of course, I want this application to be run as cost effectively as possible so I’m placing the Django app in AWS Lambda using Zappa for deployment. I gave a talk on using AWS Lambda and Zappa for a Django project at PSU MacAdmins 2017 called Imaging in 50+ Locations. Needless to say, I love deploying Django apps this way. (This post won’t go into how to use Zappa.)

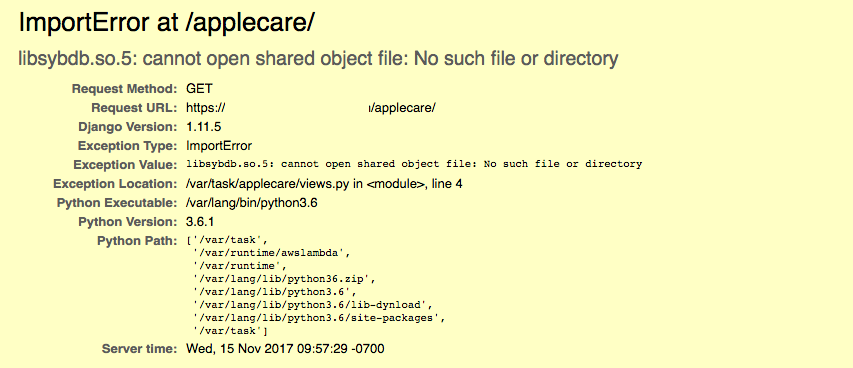
However, I ran into a problem. The open-source MS SQL library I’m using in my app is pymssql. This is a great library that works on many platforms including AWS Lambda (which is basically just the AWS EC2 Linux AMI). It even supports the latest version of Python 3.6 which I’m also using. However, pymssql relies on FreeTDS to talk to MS SQL. This normally wouldn’t be a problem since the team over pymssql also includes an option to build the software on your machine with a bundled version of FreeTDS in precompiled wheels. Sounds great until you see this error in the browser:
Screen Shot 2017-11-15 at 10.39.56 AM

The problem arises when you’re using anything greater than Python 3.5. There are no precompiled wheels for Python 3.6 for any platform. This means that when deploying my app from my test machine, a Mac, Zappa doesn’t upload a Linux compatible version of the pymssql library. It uploads a Darwin version. If I deploy from an EC2 Linux instance Zappa will upload a Linux compatible version of pymssql but it’s still missing FreeTDS. The quickest way to solve this would be for the team over at pymssql to release a precompiled Python 3.6 ‘manylinux’ wheel. Until then I need a workaround.

To keep this post short, after much Google’ing I found a solution that works for my environment:

  1. Create an EC2 Linux instance based on the Amazon Linux AMI (ami-6057e21a)
  2. SSH into the instance
  3. Install the most up-to-date version of Python 3.6, FreeTDS, the ‘gcc’ compiler, and ‘git’:
    sudo yum install python36-devel freetds-devel gcc git
  4. Clone your application code from version control:
    git clone [your_code_repo_url]
  5. Create a virtual environment for our code dependencies:
    virtualenv -p $(python3) virtualenv
  6. Activate your virtual environment and change into your code directory:
    source virtualenv/bin/activate && cd [your_code_repo]
  7. Create an environment variable to build pymssql with a bundled version of FreeTDS:
    export PYMSSQL_BUILD_WITH_BUNDLED_FREETDS=1
  8. Install your python dependencies. Make sure to install pymssql from the latest build:
    pip install git+https://github.com/pymssql/pymssql.git
  9. Copy the missing ‘libsybdb.so’ file to site-packages within the virtualenv:
    cp /usr/lib64/libsybdb.so ../virtualenv/lib/python3.6/site-packages/
  10. At this point ‘pymssql’ can run within AWS Lambda with Python 3.6

I would love to get feedback from others on how they run pymssql in AWS Lambda or if my method helps you.

MacKeeper Killer

Back in January, I read an article on iMore.com (great Apple news and rumors site) called: What ‘MacKeeper’ is and why you should avoid it. The article explains that MacKeeper, while not an actual piece of malware itself, should be avoided given that it is poorly developed and its developers use very shady business practices to try to get it onto your computer. Once installed it’s challenging to remove as well. As a general rule, I’ve always uninstalled this software for my clients even before I read the article.

A Facebook post I saw today brought this same article up again. In the past, I’ve written scripts to completely remove/uninstall/kill software that I’ve found especially troublesome for one reason or another. MacKeeper was no exception and I had written a “MacKeeper Killer” and given the script to a few people. It seemed to work well but seeing this article again today made me realize that it was time to update the script. I downloaded a fresh copy of MacKeeper, installed it in a virtual machine, found the new or changed files, and even dissected the installer package.

mackeeper-meme

Here’s the updated script I wrote this afternoon. Please excuse my nerdy comments. You’ll notice that it has some references to com.zeobit and com.mackeeper. Older versions of MacKeeper identified themselves under the com.zeobit prefix but newer ones begin with com.mackeeper. Since I don’t know what version you’re “killing”, I left both in there.

#!/bin/bash

# Kill the running processes
launchctl unload /Library/LaunchDaemons/com.zeobit.MacKeeper.AntiVirus
launchctl unload /Library/LaunchDaemons/com.zeobit.MacKeeper.plugin.AntiTheft.daemon
launchctl unload ~/Library/LaunchAgents/com.mackeeper.MacKeeper.Helper.plist
launchctl unload /Library/LaunchDaemons/com.mackeeper.MacKeeper.AntiVirus
launchctl unload /Library/LaunchDaemons/com.mackeeper.MacKeeper.plugin.AntiTheft.daemon

# Remove the application
rm -R /Applications/MacKeeper.app
rm -R /Library/Application\ Support/MacKeeper*
rm -R ~/Library/Application\ Support/MacKeeper*

# Exercise the daemons
rm -R /Library/LaunchDaemons/com.zeobit.*
rm -R /Library/LaunchDaemons/com.mackeeper.*

# Silence their helpers
rm -R ~/Library/LaunchAgents/com.zeobit.*
rm -R ~/Library/LaunchAgents/com.mackeeper.*

# Dump the caches
rm -R ~/Library/Caches/com.zeobit.*
rm -R ~/Library/Caches/com.mackeeper.*

# I prefer not to keep these
rm -R ~/Library/Preferences/com.zeobit.*
rm -R ~/Library/Preferences/com.mackeeper.*

exit 0

What the script does, if you’re not skilled in the bash language, is to stop all running MacKeeper processes and then to remove the application itself along with all the files that it places on the computer. Occasionally, there is one or two more files that MacKeeper generates that are completely benign and I didn’t feel like hunting them down. The script has succeeded in removing MacKeeper in every one of my tests, including the latest version from their website as of 05/20/15.

If you’re not a script writer, just open the Terminal application on your Mac and copy/paste the commands that don’t begin with a # symbol and press the return key. Each line of text is a new command. Your mileage may vary but I hope this gives you a head start.

Disable Photos.app Auto-Launch

Apple updated OS X to 10.10.3 last week and with it contained the new Photos app. I haven’t extensively tested Photos yet and this isn’t a review of it. However, Photos does present a complication when deploying iOS devices on a mass scale.

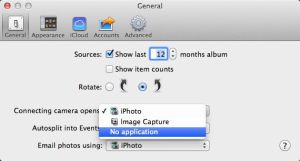
Whenever an iOS device is connected to a computer, the device identifies to the system as an iPad/iPhone/iPod touch and as a camera. iTunes will usually launch at this point as well as your system’s default camera import app. Another person over at the MacEnterprise Google Group mentioned that while he was deploying iPads using Apple Configurator, each time an iPad connected or reconnected Photos would launch. While iPhoto used to have an option to disable launching an app when a camera is connected, Photos only allows you to disable launching the app for that specific device. (examples shown below) iphoto-preferencesPhotos-Preference

So how do you set your Mac to not launch a camera application when plugging in an iOS device? Turns out, you have to change a ByHost preference file to achieve this functionality (or rather, turn off the functionality). ByHost preference files are XML plists that setup certai setting specific to your user account. You can find them by going to Finder > click in the menu bar on Go > and select Go to Folder… ( or push shift-command-G). Type in the following

~/Library/Preferences/ByHost/

and press return. This will take you to your account’s ByHost preferences directory. ByHost preferences are unique to your user account and the following actions will need to be repeated in all accounts where you want this setting.

In this directory you should see a file called com.apple.ImageCapture2.[your computer’s UUID].plist. Your computer’s UUID will be a long string of letters and numbers. Don’t worry if you don’t see the file there as the commands we’ll run will create it if it’s not already present.

Initially, I modified this plist file by hand. I had a copy of this file on another computer and it was easy just to move it over. However, this is not the best approach. Instead, to create/ modify this file we’ll be dipping into the command line and using the defaults command.

A great Github user, clburlison, left a comment on the proper commands for this job. Open the Terminal application on your Mac (Applications > Utilities > Terminal.app), copy and paste each line into the terminal, and then hit return on the keyboard:

defaults -currentHost write com.apple.ImageCapture2 HotPlugActionPath ""
defaults -currentHost write com.apple.ImageCapture2 LastHotPlugActionPath ""

That’s it! Restart your computer and the new preference file will keep Photos or any other camera application from auto-launching when a camera is plugged in.

Securing Sal

What is Sal?

Never heard of Sal? Then you need to take a trip over to YouTube and watch Multi-Tenated Munki with Puppet and Sal. Sal was written by Graham Gilbert and is a multi-tenated reporting solution that collects information about your Macs and puts them in a very nice looking dashboard. This is especially great for me since I’m trying to manage many machines, all over the country. There is even a nice plugin called Sal-WHDImport that allows WebHelpDesk to pull information about the client Macs and update its own asset database.

Let’s get down to business now. If you’re following along, please note that I won’t be covering installation of Sal. Graham has already covered this on the GitHub page for Sal: https://github.com/grahamgilbert/sal/blob/master/docs/Installation.md I’ve installed Sal in a Hyper-V virtual machine and it’s running on Ubuntu 14.04.1 LTS with Apache2.

The Cert

The first thing I had to do was get a certificate from my SSL certificate vendor, DigiCert. But that means I need what is called a CSR (certificate signing request). Basically, it’s a file that contains a unique server encryption key that was then signed by your server. Once given to DigiCert, they will then sign the CSR and give it back to you. This will enable your browser to trust the website you’re trying to access and make a secure connection. I had never generated a CSR on my own before (WebHelpDesk includes an app called Portecle that handles the CSR for you). Luckily, DigiCert has a great OpenSSL CSR Tool to help you generate a line of code you then use on your server to generate a CSR. After I did that, I followed DigiCert’s guide: Ubuntu Server with Apache2 SSL Certificate Installation

Enabling SSL

I modified the /etc/apache/sites-enabled/sal.conf file for SSL. Here’s a copy of what it looks like at this point:


 ServerName sal.example.com
 SSLEngine on
 SSLCertificateFile /usr/local/certs/star_example_com.crt
 SSLCertificateKeyFile /usr/local/certs/ssl_csr/sal_example_com.key
 SSLCertificateChainFile /usr/local/certs/DigiCertCA.crt
 WSGIScriptAlias / /usr/local/sal_env/sal/sal.wsgi
 WSGIDaemonProcess sal user=saluser group=salgroup
 Alias /static/ /usr/local/sal_env/sal/static/
 
 WSGIProcessGroup sal
 WSGIApplicationGroup %{GLOBAL}
 Order deny,allow
 Allow from all
 Require all granted


I noticed that this file didn’t call for any SSL protocol or cipher suite declarations. I found those /etc/apache2/mods-enabled/ssl.conf. I did a web search for “Apache2 SSL Hardening” and found a great article by SSLLabs: Configuring Apache, Nginx, and OpenSSL for Forward Secrecy The ssl.conf file contains many settings but the ones we’re after are below. I changed the ciphers line to use colon-delimited since Apache2 on Ubuntu didn’t like spaces between them.

SSLProtocol all -SSLv2 -SSLv3
SSLHonorCipherOrder on
SSLCipherSuite EECDH+ECDSA+AESGCM:EECDH+aRSA+AESGCM:EECDH+ECDSA+SHA384:EECDH+ECDSA+SHA256:EECDH+aRSA+SHA384:EECDH+aRSA+SHA256:EECDH+aRSA+RC4:EECDH:EDH+aRSA:RC4:!aNULL:!eNULL:!LOW:!3DES:!MD5:!EXP:!PSK:!SRP:!DSS
 

At this point a quick test on SSL Labs gets us an “A” rating. We can do better though.

Enabling HSTS

Since I’m working with Apache2, enabling the HTTP Strict Transport Protocol is very straight forward. I did a couple more web searches and pieced together a method I liked. At this point /etc/apache/sites-enabled/sal.conf looks like this:


 Header add Strict-Transport-Security "max-age=31536000; includeSubDomains"


 ServerName sal.example.com
 SSLEngine on
 SSLCertificateFile /usr/local/certs/star_example_com.crt
 SSLCertificateKeyFile /usr/local/certs/ssl_csr/sal_example_com.key
 SSLCertificateChainFile /usr/local/certs/DigiCertCA.crt
 WSGIScriptAlias / /usr/local/sal_env/sal/sal.wsgi
 WSGIDaemonProcess sal user=saluser group=salgroup
 Alias /static/ /usr/local/sal_env/sal/static/
 
 WSGIProcessGroup sal
 WSGIApplicationGroup %{GLOBAL}
 Order deny,allow
 Allow from all
 Require all granted


However, I kept getting an error that the mod_header.so mod wasn’t found. This is easy to fix with one command:

sudo a2enmod headers

I restarted Apache2 and found that HSTS was enabled! We now get an “A+” grade, which is fantastic. There is one more thing to do.

Enable a Redirect

You may notice, at this point, that you have two sites. A default Ubuntu page at port 80 (http://sal.example.com) and Sal at port 443 (https://sal.example.com). What we would like is to have users redirected to Sal on port 443 even if the visit the site over port 80. We just need to make another small change to /etc/apache/sites-enabled/sal.conf. It will look like this when we’re done:

 Header add Strict-Transport-Security "max-age=31536000; includeSubDomains"
 ServerName sal.example.com
 Redirect / https://sal.example.com


 ServerName sal.example.com
 SSLEngine on
 SSLCertificateFile /usr/local/certs/star_example_com.crt
 SSLCertificateKeyFile /usr/local/certs/ssl_csr/sal_example_com.key
 SSLCertificateChainFile /usr/local/certs/DigiCertCA.crt
 WSGIScriptAlias / /usr/local/sal_env/sal/sal.wsgi
 WSGIDaemonProcess sal user=saluser group=salgroup
 Alias /static/ /usr/local/sal_env/sal/static/
 
 WSGIProcessGroup sal
 WSGIApplicationGroup %{GLOBAL}
 Order deny,allow
 Allow from all
 Require all granted

There! Now it’s perfect.

Conclusion

Is there anything revolutionary about what I just covered? Nah. In fact, this should probably be called “Securing Apache.” Nevertheless, citing a real use case is always helpful. I’m very excited to have Sal as another member of my solution-stack. With SSL hardened and getting a great grade from SSLLabs, we’re ready to start improving our client’s experience.

Securing Web Help Desk

At my company, we use Solarwinds Web Help Desk. It a great piece of software for managing tickets, inventory, and even works as a service calendar, though we don’t really use that feature. We recently moved offices and had some downtime on our help desk server. I took this opportunity to make security improvements to our help desk.

I started off with an SSL certificate from DigiCert. We purchased a wildcard cert so we could secure multiple subdomains. I followed the directions in the WHD Administrator Guide to enable SSL. I’m new to the whole certificate thing so this was a little rocky but I got it done just the same. Feeling accomplished, I went to SSL Labs to test my site’s security. I got a surprising ‘C’ grade. That didn’t feel very good. SSL Labs told me that my grade was due to weak cipher strength, TLS v1.1 & 1.2 not enabled, Secure Client-Initiated Renegotiation is allowed, and Forward Secrecy was not an option. However, the Admin Guide didn’t mention anything except how to setup the SSL cert and force clients to use HTTPS. I’m a fan of Steve Gibson’s SecurityNow! podcast over at TwiT.TV so I understand how important it is to improve your security beyond just an SSL cert.

After some digging online, I came up with a great set of changes to make to the help desk. It wasn’t easy so I’m posting them here. It’s worth noting the specs of our system before moving on. Your system may vary but the principals will be the same.

Here are the specs of our install:

Web Help Desk Version: 12.1.0 – Build #12.1.0.300
OS Name: Mac OS X
OS Version: 10.9.4
Architecture: x86_64
Java Version: 1.6.0_65 x86_64 (Apple Inc.)
Tomcat Server number: 7.0.35.0

Now, let’s address each issue:

Weak Ciphers

I was directed by WHD tech support to this forum post: https://thwack.solarwinds.com/thread/64296 Someone in my exact situation was asking the right questions in the right place. Another person responded to change the ciphers in the /Library/WebHelpDesk/conf/tomcat_server_template.xml file. I did that and was now getting a ‘B’ grade. Nothing else had changed. I pressed on thinking that I was done in this area… (skip to Forward Secrecy to see what ciphers I ended up using)

TLS v1.1 & 1.2

I know that the WHD is a Java web app that runs on Apache Tomcat. I inspected the /conf/tomcat_server_template.xml file further and found the line that specifies that TLS be used as the main protocol. SSL Labs showed that TLS v1.0 was running but why not v1.1 or 1.2?  I’ve done some work with Apache before but not Tomcat so I felt a little lost. Luckily, Tomcat is well documented. I kept running into this security document on Tomcat’s website: http://tomcat.apache.org/tomcat-7.0-doc/ssl-howto.html I didn’t need the SSL cert parts of it but found an area that talked about changing the “protocol=TLS” line to “sslEnabledProtocols=TLSv1,TLSv1.1,TLSv1.2,SSL3” I did this and broke WHD. After a couple of hours, it occurred to me that Tomcat uses Java to implement security features and I wasn’t using the latest v1.7.0_65. Apple computers always requested a version supplied by Apple, even if a newer version is installed. I read in this post (http://stackoverflow.com/questions/12757558/installed-java-7-on-mac-os-x-but-terminal-is-still-using-version-6) how to change that. I installed the Java JDK v1.7.0_65 from Oracle(http://www.oracle.com/technetwork/java/javase/downloads/index.html) and changed the alias for “Home” in the /Library/Java directory to stop looking at the Java “1.6.0_65” home and to now look at /Library/Java/JavaVirtualMachines/jdk1.7.0_65.jdk/Contents/Home instead. I did this by first removing the /Library/Java/HOME alias in Terminal (sudo rm /Library/Java/HOME) and creating a new symlink (sudo ln -s  /Library/Java/JavaVirtualMachines/jdk1.7.0_65.jdk/Contents/Home /Library/Java/) WHD errored out and said that “Unlimited Strength  Jurisdiction Cryptography” wasn’t enabled.  WHD also told me it was missing two files from its directory (local_policy.jar & US_export_policy.jar)  Since I just upgraded Java, I wanted the newest versions of those files as well. Downloaded the needed files here: http://www.oracle.com/technetwork/java/javase/downloads/jce-7-download-432124.html I extracted them and placed them in the /Library/WebHelpDesk/conf/java6jce/ directory. Now, TLSv1.1 and v1.2 are enabled and SSL Labs shows the help desk has an ‘A-‘ rating. You can even leave the protocol=TLS” alone, if you want. Pretty good but we can do better.

Forward Secrecy (a.k.a. Ciphers – Part 2)

In researching forward secrecy, I found out that this has little to do with WHD itself and everything to do with Tomcat and how it handles TLS/SSL. I found a blog post talking about Tomcat SSL Hardening: http://blog.bitmelt.com/2013/11/tomcat-ssl-hardening.html I ended up changing my ciphers again to this list:

TLS_ECDHE_RSA_WITH_AES_256_GCM_SHA384,TLS_ECDHE_ECDSA_WITH_AES_256_GCM_SHA384,TLS_ECDH_RSA_WITH_AES_256_GCM_SHA384,TLS_ECDH_ECDSA_WITH_AES_256_GCM_SHA384,TLS_ECDHE_RSA_WITH_AES_128_GCM_SHA256,TLS_ECDHE_ECDSA_WITH_AES_128_GCM_SHA256,TLS_ECDH_RSA_WITH_AES_128_GCM_SHA256,TLS_ECDH_ECDSA_WITH_AES_128_GCM_SHA256,TLS_ECDHE_RSA_WITH_AES_256_CBC_SHA384,TLS_ECDHE_ECDSA_WITH_AES_256_CBC_SHA384,TLS_ECDHE_RSA_WITH_AES_256_CBC_SHA,TLS_ECDHE_ECDSA_WITH_AES_256_CBC_SHA,TLS_ECDH_RSA_WITH_AES_256_CBC_SHA384,TLS_ECDH_ECDSA_WITH_AES_256_CBC_SHA384,TLS_ECDH_RSA_WITH_AES_256_CBC_SHA,TLS_ECDH_ECDSA_WITH_AES_256_CBC_SHA,TLS_ECDHE_RSA_WITH_AES_128_CBC_SHA256,TLS_ECDHE_ECDSA_WITH_AES_128_CBC_SHA256,TLS_ECDHE_RSA_WITH_AES_128_CBC_SHA,TLS_ECDHE_ECDSA_WITH_AES_128_CBC_SHA,TLS_ECDH_RSA_WITH_AES_128_CBC_SHA256,TLS_ECDH_ECDSA_WITH_AES_128_CBC_SHA256,TLS_ECDH_RSA_WITH_AES_128_CBC_SHA,TLS_ECDH_ECDSA_WITH_AES_128_CBC_SHA,TLS_ECDHE_RSA_WITH_3DES_EDE_CBC_SHA,TLS_ECDHE_ECDSA_WITH_3DES_EDE_CBC_SHA,TLS_ECDH_RSA_WITH_3DES_EDE_CBC_SHA,TLS_ECDH_ECDSA_WITH_3DES_EDE_CBC_SHA

We’re now getting an ‘A’ rating! Feeling pretty good now.

Secure Client-Initiated Renegotiation

Why is something with “secure” in its name a problem? Normally, it’s not; but, in this case, this feature opens you up to a Denial-of-Service attack. No Bueno. In the previous blog post (http://blog.bitmelt.com/2013/11/tomcat-ssl-hardening.html) the author mentioned changing the protocol="HTTP/1.1" to protocol="org.apache.coyote.http11.Http11NioProtocol” in the server.xml file (/conf/tomcat_server_template.xml for my purpose.) I made the change and broke WHD. It then occurred to me that the same documentation I’ve been using to configure the SSL protocol (http://tomcat.apache.org/tomcat-7.0-doc/ssl-howto.html) keeps referring to Tomcat v7.0.54. I’m using v7.0.35. So, I downloaded the latest version of Tomcat from http://tomcat.apache.org/download-70.cgi. I extracted the update and copied all the files to the /Library/WebHelpDesk/bin/tomcat directory and made sure that the permissions were changed to match what was there before (owner=root, group=admin) I added protocol="org.apache.coyote.http11.Http11NioProtocol” again and WHD is fully functional. Still have an ‘A’ rating on SSL Labs and Secure Client-Initiated Renegotiation is unsupported.

Conclusion

WHD is a great product. I recommend anyone use it. However, it’s worth saying that any product that runs on open source software is likely not to keep up-to-date with each version of that software. WHD was happy running on an older version of Java and an older version of Tomcat; and, until I did some digging, so was I. Now that I know more about the security options available, I’m a little disappointed that Solarwinds doesn’t make it easy to turn these features on. It doesn’t even document them in their guide. Oh well. Oracle, Apache, and several well-informed users came to my rescue with their free documentation. Consider this post as me giving back.